No products in the basket.
Blushing
Blooming, Blushing, Colour Change

Description
A milky white haze or mist formed on the surface of the paint film.
Cause
Moisture condensing on, and being trapped in the wet film. This may be due to:
a) Spraying during the cold, wet or humid weather.
b) Use of too fast or poor quality thinner.
c) Compressed air pressure onto the film to speed up solvent release.
d) Draughty paint shop, or inadequate heating and / or air movement.
Prevention
a) If possible, avoid spraying air drying paint during rainy or exceptionally cold or humid weather. If this is unavoidable, a non-bloom thinner should be used.
b) Use the correct grade of thinner.
c) Reduce compressed air pressure to minimise the cooling effect.
d) Allow solvent release to take place naturally.
e) Ensure that the paint shop is adequately heated, properly ventilated and free from draughts.
Rectification
Slight blooming may be removed by the use of polishing compound, after the paint film has hardened, or by spraying the affected area with non-bloom thinners.
In more severe cases, rub down the surface, and repaint using the correct grade of thinner or non-bloom thinner.
If these remedies fail to correct the fault, raises the temperature of the paint shop by a minimum of five degrees, avoid all direct draughts, flat and repaint the affected area.
Note: Blooming of the colour coat may indicate that the undercoats have been similarly affected, the defect having gone unnoticed due to their matt finish. This may subsequently give rise to blistering or loss of intercoat adhesion.
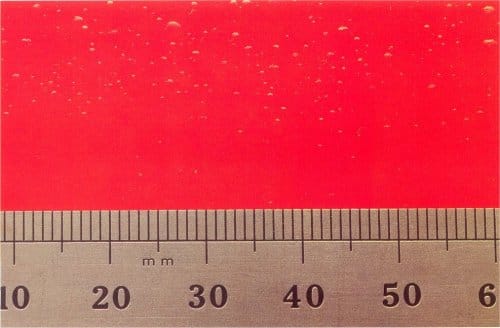
Blooming
Colour Change, Misting

Description
A milky white haze or mist formed on the surface of the paint film.
Cause
Moisture condensing on, and being trapped in the wet film. This may be due to:
a) Spraying during cold, wet or humid weather.
b) Use of too fast or poor quality thinner.
c) Compressed air pressure too high, and/or poor spray gun set up.
d) Fanning compressed air onto the film to speed up solvent release.
e) Draughty paint shop, or inadequate heating and/or air movement.
Prevention
a) If possible, avoid spraying air drying paint during raining or exceptionally cold or humid weather. If this is unavoidable, a non-bloom thinner should be used.
b) Use correct grade of thinner.
c) Reduce compressed air pressure to minimise the cooling effect.
d) Allow solvent release to take place naturally,
e) Ensure that the paint shop is adequately heated, properly ventilated and free from draughts.
Rectification
Slight blooming may be removed by the use of polishing compound, after the paint film has hardened, or by spraying the affected area with non-bloom thinners.
In more severe cases, rub down the surface, and repaint using the correct grade or thinner or non-bloom thinner.
If these remedies fail to correct the fault, raise the temperature of the paint shop by a minimum of five degrees, avoid all direct draughts, flat and repaint the affected area.
Note: Blooming of the colour coat may indicate that the undercoats have been similarly affected, the defect having gone unnoticed due to their matt finish. This may subsequently give rise to blistering or loss of intercoat adhesion.
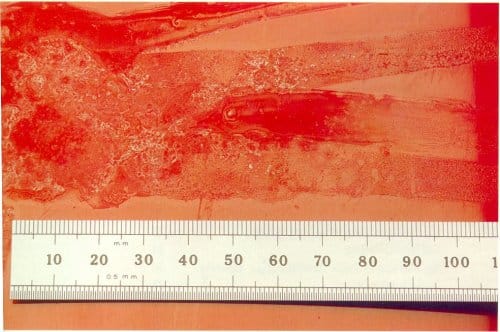
Blistering
Blistering, Bubbles
Description
Blisters appear as swellings on the surface of the paint and vary considerably in both size and density.
Coarse blisters, larger than 1.5mm in diameter, generally occur in patches, although they may also be found in isolation.
Fine blisters, typically from 0.5mm rings, meandering lines or in the shape of a finger print.
Blisters in the colour coat are generally more prominent than those occurring between paint and substrate.
Cause
Moisture or contaminants trapped under the surface. This may result from:
a) Inadequate surface cleaning, leaving residual moisture or contaminants such as oil, industrial pollutants or grease from finger tips.
b) Incompatible materials or the use of non-recommended thinners.
c) Insufficient thickness of paint leading to increased permeability.
d) Water permeating both newly applied and aged films. Exposure to rain or high humidity before the finish is fully hardened increases the risk of blisters caused by permeation.
Prevention
a) Protect vehicle surfaces when in store, and clean surfaces scrupulously before spraying.
b) Use only top quality recommended and approved materials.
c) Follow the correct spraying processes.
d) Avoid exposure to moisture and extreme temperature changes until the finish is fully hardened.
Rectification
Establish the depth and cause of the blister by pricking out with a pin and examining under a low power magnifying glass.
Where the blisters occur between paint layers, the affected area may be sanded down to a sound surface and repainted.
In more severe cases, or where the blisters occur between the undercoat and the substrate, strip down to the substrate and repaint.
BLOWING
Air Entrapment, Air Trapping, Blowing
DESCRIPTION
Large rounded air bubbles or blisters, usually occurring in the area of seams and boxed in corners, or over heavily filled plastic surfaces.
CAUSE
Air trapped beneath the paint expands, resulting in the detachment of the paint film from the substrate.
This frequently results from:
a) Poor application of filler, stopper or primer resulting in entrapped air.
b) Poor feather edging of chipped film.
c) Bridging of seams and boxed corners by the paint film.
d) Porosity and air pockets in the primer due to inferior or insufficient thinner, the compressed air pressure too high, or dry spraying.
e) Failure to prepare and seal substrate correctly, especially when spraying GRP.
f) Excessive application of heat during drying.
PREVENTION
a) Ensure correct application of filler, stopper or primer.
b) Feather edges of chipped film properly.
c) Avoid heavy paint application and ensure that the film penetrates into seams and boxed corners.
d) Always use recommended thinner and correct spraying techniques. Apply primers in thin web films.
e) Examine the substrate for porosity, especially for gel coat bubbles in GRP. Prepare and seal carefully.
f) Avoid excessive application of heat during drying.
RECTIFICATION
The paint must be removed to the depth of the bubble, any underlying defect remedied and the area repainted.
Bleaching
Bleaching, Colour Change
Description
Yellowing of the surface corresponding to areas of filler in the substrate.
Cause
Excess quantities of peroxide used in the filler.
Prevention
Use a feed machine for mixing filler, or take care to calculate and measure peroxide quantities accurately.
Rectification
Rub down the affected area to the surface of the filler, seal with isolator or epoxy primer and repaint.
Acid Attack
Acid Attack, Bird Droppings
Description
Irregular patches of roughened, discoloured, partly stripped or disintegrating surface, possibly with crazing or cracking in the affected area. Traces of the attacking substance may be present.
Cause
Chemical corrosion of the paint film. This is often due to:
a) Accidental spillage of corrosive substances such as brake fluid, peroxide, or battery acid.
b) Acid rain standing on the surface
c) Use of detergents on new surfaces.
Prevention
a) Maintain good housekeeping practices, and protect surfaces when working on vehicles.
b) Protect vehicle during outside storage.
c) Avoid using detergents on newly painted surfaces.
d) Ensure the paint film is fully cured.
Rectification
Light damage may be remedied by flatting, compounding and polishing. In the event of more severe attack, remove the paint down to a sound surface, ensure that all traces of contaminants are removed, and repaint.
Silking
Silking, Streaking

Description
Evident in metallics when all the aluminium particles tend to run the one way. Encountered mostly on vertical surfaces where the weight of the aluminium “drops” through the applied coat.
Cause
a) Applying metallics too heavily almost to the run and sag stage.
b) Wrong thinning reduction.
c) Wrong gun adjustment and technique.
d) Insufficient flash time between coats.
Prevention
a) Do not apply in heavy wet coats.
b) Use recommended thinning ratios.
c) Use good spray techniques i.e. gun held at right angles 15-20 cm from the job with a constant gun speed over complete area.
d) Allow recommended flash times between coats.
Rectification
If silking has already occurred, sand with fine paper and refinish.
Runs & Sags
Curtaining, Drips, Gun Spits, Overloading, Pebbling, Runs & Sags, Sagging, Sags
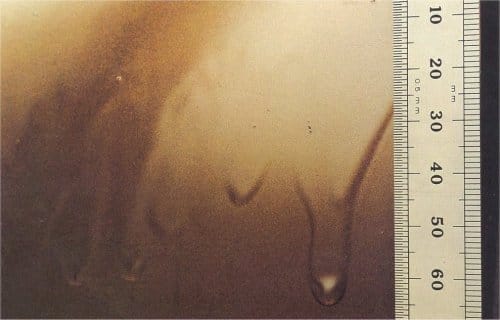
Description
Well defined local thickening of the paint film in the form of a wavy line or shallow, rounded ridges, normally confined to sharply sloping or vertical surfaces.
Cause
Slumping of the paint due to:
a) Excess thickness of application, air pressure too low, fan width too narrow, spray gun too close to the surface or moving too slowly.
b) Use of poor quality or incorrect thinner.
c) Incorrect viscosity of the paint.
d) Air of surface temperature too low.
e) Contamination of the underlying surface.
Prevention
a) Use the correct spraying technique and spray gun settings.
b) Use only recommended thinner.
c) Ensure that the paint is mixed to the correct viscosity.
d) Always spray within the recommended temperatures.
e) Ensure that the surface is scrupulously clean.
Rectification
Allow the paint to harden thoroughly, rub down excess paint, flat, compound and polish. In severe cases it may be necessary to rub down and repaint the surface.
Note: Due to separation of the metal flakes, metallic paints will normally require repainting.
Pickling
Cracking, Pickling
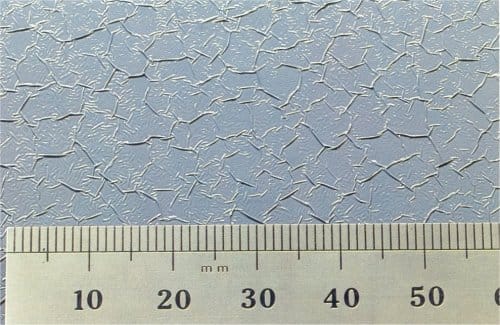
Description
Swelling or wrinkling of the paint surface, varying in severity and most often occurring around feathered edges. The underlying paint may break through the topcoat.
Cause
Reaction with the underlying surface resulting from the application of nitro or thermosetting enamels over thermoplastic acrylics or airdrying synthetics.
Prevention
Ensure compatibility of materials or that the underlying layer is thoroughly sealed.
Rectification
Rub down the affected area, taking care not to uncover any areas which could give rise to the same problem, seal the surface and repaint. In severe cases rub down the affected area to the substrate and repaint.
Overspray
Fuzz, Hazing, Overspray, Poor Melt In
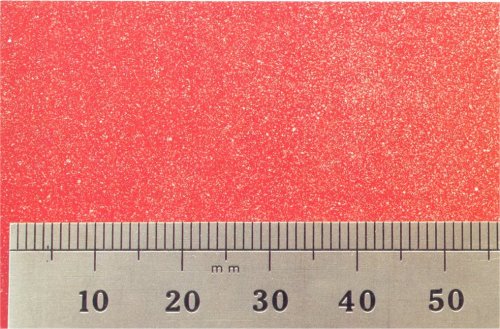
Description
Areas of granular paint particles adhering to, or partially absorbed in the surface of the film.
Cause
Spray dust deposited on the surface. This results from:
a) Poor masking.
b) Paint from a subsequent application settling on the surface.
c) Compressed air pressure too high.
d) Inadequate extraction or ventilation.
Prevention
a) Mask carefully and completely, ensure that the edges of masking tape are thoroughly sealed.
b) Protect adjacent surfaces from spray dust.
c) Set compressed air pressure as low as possible, consistent with proper atomisation.
d) Use a spray booth, and ensure correct air circulation and extraction.
Rectification
Rub down with abrasive compound and polish.