No products in the basket.
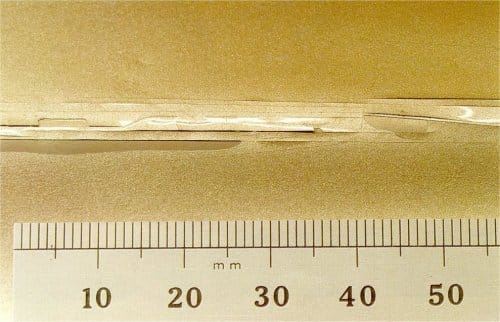
Flaking
De-lamination, Flaking, Inter-coat Adhesion Failure, Peeling, Poor Adhesion, Poor Bond, Shelling
DESCRIPTION
The paint lifts from its underlying surface in smooth flakes. These flakes may be easily broken, with a tendency for the edges to peel away from the surface.
CAUSE
Loss of adhesion between a layer of paint and its underlying surface. This may be caused by:
a) Contamination of the underlying surface by wax, grease, silicone, oil, release agents, water, corrosion or soap.
b) Incorrect or non-use of metal conditioner on steel or aluminium surfaces.
c) Inadequate keying of the surface.
d) Surface too hot or too cold when sprayed.
e) Use of the wrong primer process, primer not properly dry.
f) Incorrect viscosity of paint, use of wrong or poor quality thinner, compressed air pressure too high.
g) Paint film applied too thickly.
h) Build up of stress between two adjacent layers of paint.
PREVENTION
a) Ensure that the surface to be painted is scrupulously clean. Always dry the surface with clean cloths.
b) Always use the correct metal conditioner on steel or aluminium surfaces. Commence spraying within 30 minutes of preparation to avoid the onset of corrosion.
c) Sand the surface properly before spraying, taking care to remove all sanding dust.
d) Ensure that the surface is within the recommended temperature range during spraying and drying.
e) Use the correct primer process, and ensure that the primer is properly dry before continuing painting.
f) Thin the paint to the correct viscosity, using only recommended thinner. Set compressed air pressure as low as possible consistent with proper atomisation.
g) Apply paint in thin, wet layers.
h) Use a range of products by a single paint manufacturer.
RECTIFICATION
Remove the detached paint from the affected area. Prepare the underlying surface correctly and repaint.
File Marks
File Marks
DESCRIPTION
Heavy file marks showing through topcoats.
CAUSE
Deep scars left by coarse files without sufficient filling from undercoat and putty applications.
PREVENTION
a) Sand file marks with an orbital sander, or wet or dry paper to eliminate deep gouges.
RECTIFICATION
Fill with adequate applications of undercoat and stopper. If file marks are already showing, sand to smooth surface and refinish with undercoat, apply stopper, undercoat gain, then spray topcoats.
Feather Edge Cracks
Feather Edge Cracks
DESCRIPTION
Cracking around the edges of a feather-edge repair.
CAUSE
a) Too much or poor quality thinner or reducer.
b) Improper substrate preparation brought about by using coarse papers on feather edges with resultant attack by solvents from the following paint coatings.
c) ‘Piling-on’ in heavy wet coats.
d) Effect of an old finish or previous repair.
e) Poor shop temperature (too cold).
f) Fanning with air to dry.
g) Fast flash time between coats.
PREVENTION
a) Choose correct thinning ratio and use specified thinner.
b) Use fine papers to feather edges of repair.
c) Do not apply in heavy wet coats.
d) Ensure new top coat is compatible with substrate underneath.
e) Heat shop area or substrate being painted.
f) Do not fan with air as this causes surface drying only.
g) Allow recommended flash times between coats.
RECTIFICATION
To eliminate feather edge cracking, sand to a sound, smooth finish and refinish.
Dull Finish
Clouding, Colour Change, Floatation, Floating, Flooding, Haloing, Lapping Marks, Mottling, Patchiness, Ringing, Shadowing, Striping, Uneven Application
DESCRIPTION
Although apparently smooth and evenly applied, the surface lacks shine.
CAUSE
Microscopic roughness of the surface, which may result from:
a) Poor hold out of primer, or the application of topcoat over primer which is not thoroughly dry.
b) Poor quality or incorrect thinner, or the use of additives in the paint.
c) Incorrectly prepared or poorly applied paint.
d) Application over a poor substrate
e) Excessively slow drying due to high humidity or low temperature.
f) Solvent fumes or exhaust gases attacking the surface.
g) Surface contamination by wax, grease, oil, soap or water.
h) The use of strong detergents or cleaners on a newly painted surface, compounding too soon after painting or using compound which is too coarse.
PREVENTION
a) Use an approved primer, and allow to dry thoroughly before applying the topcoat.
b) Use only recommended thinner and approved additives.
c) Ensure that the paint is stirred thoroughly, apply under the correct conditions using proper spraying techniques.
d) Prepare the substrate thoroughly.
e) Ensure that the paint dries under warm and dry conditions.
f) Ensure good, draught free air over surfaces whilst drying.
g) Wipe the undercoat with solvent and dry thoroughly before applying the topcoat.
h) Avoid using strong detergents or cleaners on newly painted surfaces. Do not compound paint until thoroughly hard and always use the correct grade of compound.
RECTIFICATION
Normally the shine may be restored by rubbing down with abrasive compound and polishing. If the dulling is too severe for this to yield satisfactory results, rub down the topcoat and repaint.
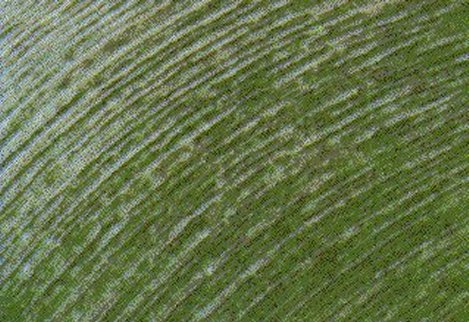
Crazing
Alligatoring, Checking, Crazing, Crocodiling, Crows Footing, Hair Lining
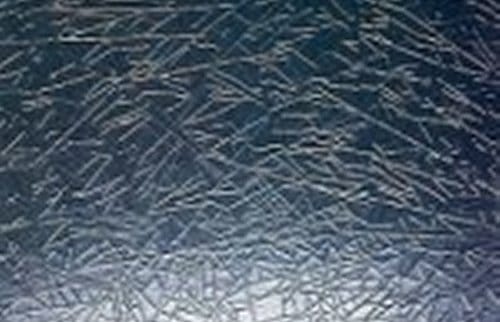
DESCRIPTION
Appears to the naked eye as a loss of gloss, close examination under low magnification reveals a large number of minute cracks.
CAUSE
Excessive stresses in the paint film due to:
a) Inadequate mixing of materials prior to application, insufficient thinning or the wrong grade of thinner.
b) Excessive film thickness, colour coat applied over inadequately dry or excessively thick under coats.
c) Incorrect use of additives.
PREVENTION
a) Always mix paint thoroughly, and use the correct amount of recommended thinner.
b) Use correct spraying techniques. Apply paint in thin, web films and allow adequate drying time between coats.
c) Only use approved additives.
RECTIFICATION
Sand the affected area down to a sound, smooth finish and repaint.
Cracking
Cracking, Splitting
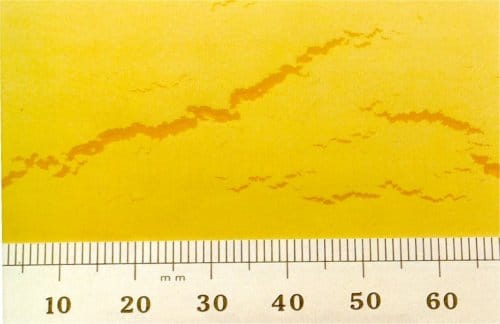
DESCRIPTION
Random breaks or crevices in the paint film, often adjacent to filled seams or panel edges. Cracks frequently take form of a three pointed star. The depth of penetration of the paint film varies, severe cracks may penetrate to the substrate.
Fine cracks of splits may occur at the featheredge of a spot repair shortly after the application of the topcoat.
CAUSE
Weakness such as blistering being exaggerated by weathering, or magnification of stresses normally present in the paint film. These stresses are increased by:
a) Inadequate mixing of materials prior to application, insufficient thinning of the wrong grade of thinner.
b) Poor preparation of the surface; too coarse abrasives, inadequate cleaning or poor seam filling.
c) Contamination by oil or water in the air line.
d) Excessive film thickness and insufficient drying time between coats, cold air fanning causing the surface to dry over trapped solvent.
e) Substrate too hot or too cold during spraying
f) Application of thermosetting topcoat over partially cured paint film or thermoplastic acrylic topcoat.
PREVENTION
a) Always mix paint thoroughly, and use the correct amount of recommended thinner.
b) Prepare the surface carefully, using the correct grade of abrasives. Ensure that seams are correctly filled. Clean surfaces thoroughly, paying special attention to feather edges.
c) Always maintain compressed air equipment properly.
d) Use correct spraying techniques. Apply paint in thin, wet films and allow adequate drying time between coats.
e) Ensure that the surface is within the recommended temperature range before commencing spraying.
f) Isolate the thermoplastic acrylic with a light coat of epoxy primer.
RECTIFICATION
In minor cases, where only the topcoat is affected, sand down to a sound finish and repaint.
If cracking has penetrated the primer, strip all paint from the affected area, ensure that any defects in the substrate are corrected and repaint.
Corrosion
Corrosion, Rust Under Film, Rusting
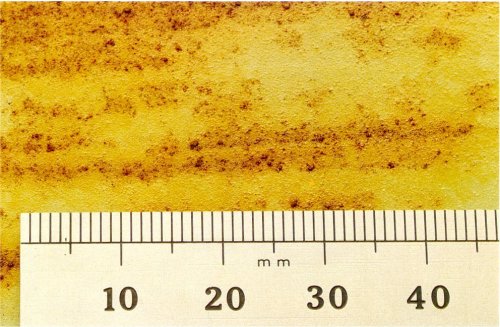
DESCRIPTION
Loose paint, bubbling and discolouration of the paint film, especially around body fittings, panel edges and seams.
CAUSE
Corrosion of the metal substrate, resulting in loss of adhesion of the paint. This is frequently caused by:
a) Exposure of bare metal surfaces by accidental damage, or by leaving drilled holes untreated.
b) Exposure of bare metal surfaces due to destruction of the paint film by contamination.
PREVENTION
a) Ensure that all metal surfaces are treated with the correct metal treatment fluids and etch primer prior to painting.
b) Repair any damage to the paint film as soon as possible. Always treat any newly exposed metal edges immediately.
RECTIFICATION
Strip the paint from the affected area down to the bare metal, remove all existing corrosion, treat the surface with the correct metal treatment fluids and etch primer, and repaint.
Chalking
Chalking
DESCRIPTION
A chalky dusting or powdering at the paint surface, often associated with old, weathered paint film.
CAUSE
Precipitation of elements within the paint.
This may be due to:
a) Incompatible or defective materials within the paint.
b) Degradation of the binding agent.
c) Degradation of pigment.
PREVENTION
a) Use recommended materials.
b) Avoid exposure to ultra-violet light (strong sunlight) and harsh shampoos.
RECTIFICATION
Flat, compound and polish the surface to restore the gloss. In severe cases repaint the topcoat.
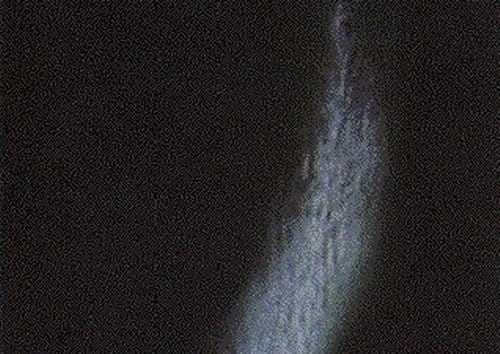
Bronzing
Bronzing, Colour Change
Description
This defect is peculiar to certain blue, maroon and black pigments. It is formed by a loosely adhering pigment layer in the surface which is slightly different in colour from the original paint, and which imparts a metallic sheen to the surface.
Cause
a) Certain pigments will show slight bronzing in any paint vehicle, and the painter has no control over this condition.
b) Recommended mixing formula not followed. Certain pigments will show bad bronzing if an upper limit is exceeded in the paint.
c) Hot spraying of some reds or maroons.
Prevention
a) Follow the recommended mixing formula.
b) Some reds or maroons may have to be sprayed cold.
Rectification
a) Light hand polishing with a mild liquid polish will remove the bronze. Frequent washing and an occasional polish will maintain good appearance.
b) In severe cases, wet flat the colour then respray.
SLOW DRYING
Poor Drying, Slow Drying, Softness
DESCRIPTION
The paint film requires an excessive drying period, or fails to harden thoroughly.
CAUSE
Slow evaporation of solvent from the paint. This may be due to:
a) Excessive thickness of the paint film.
b) Poor atmospheric conditions during spraying or drying, coldness, humidity, lack of air movement.
c) Insufficient drying time between coats.
d) Insufficient, poor quality or incorrect thinner.
PREVENTION
a) Apply paint in thin web films.
b) Ensure adequate warmth and ventilation. Avoid spraying in excessively humid conditions.
c) Allow sufficient drying time between coats.
d) Use the correct amount of recommended thinner.
RECTIFICATION
Move the vehicle to a warm, well ventilated area. Low heat may be applied to improve drying, but care must be exercised to avoid wrinkling.